Phew! This is it - the final project for Flatiron! I can’t believe I’m at the finish line for such an incredible, challenging bootcamp. For my final project, I wanted to create something that is definitely in line with the theme of other projects I’ve made, as well as make something that will be useful for the future. A month ago, my wife and I were hiking Guadalupe Mountain in West Texas, and we did not bring enough water. We really struggled on the final 2 miles of the descent and were so relieved to get to our car. The Trail Run Planner app will help people like us, who forget what to pack for trail runs! This app allows users to view trails in their area and add days to run specific trails to their personal running journal. Within their journal, users can then select what items they need to bring on their run, such as a cell phone, jacket, water, food, etc. Right now, the app sends an alert to the user of the items they need to bring. However, in the future, I would like to implement either an iCal or Email reminder with the information of what to bring on the hike.
Phase 1: Planning
Flatiron has taught me how to code, and how to PLAN before coding. We started with a user story:
*Carl is an avid trail runner who loves discovering new trails and making new paths. Carl’s excitement for the outdoors constantly makes him accidentally forget to pack everything for his runs. In fact, Carl recently went running on a desert trail and forgot to bring water! With the Trail Running Planner (TRP), Carl doesn’t need to worry about forgetting his trail running gear ever again. Carl will be able to:
- View trails in his area.
- See detailed information on each trail.
- Add each upcoming trail run to his personal journal with the date and a packing list of items to bring on the trail. *
Phase 2: Backend
For this project I created a Rails API to handle users and their journals. Creating the API using vertical alignment is what helped make this process go quickly (plus the help of $rails g resource) The database only has 2 models: users and journals. At first, I thought a trails model would be necessary, but you’ll see why it’s not necessary in a little bit. After creating the model’s relationships, enabling CORS for fetch calls, and testing models in the console, I established my routes and tested my controllers. To make sure each controller method was being hit, I used binding.pry within each controller method before moving to the frontend.
Phase 3.1: Frontend
To get started on the frontend, our project required React, so with the useful $create-react-app command, I was able to get a basic app up and running. I immediately connected the top-level component, index.js, to the Redux store, to keep state in one place. I also knew, from planning, that my app would use multiple fetch calls to 3rd-party APIs and my Rails backend. So, I connected thunk middleware to the store!
Phase 3.2: React 3rd-Party API Fetch Calls
I wanted this app to be incredibly dynamic. I didn’t want to make an app that would work for just Austin, TX, or just San Francisco, CA. This app needed to be useable anywhere in the USA.

The Hiking Project API was the perfect place to go for this. They have an API with thousands of trails in and around the US. According to their docs, in order to make a fetch call to a specific latitude and longitude, like this:
https://www.hikingproject.com/data/get-trails?lat=40.0274&lon=-105.2519&maxDistance=10&key=example-key
So, I couldnt’ just enter “City”, “State” like I had wished… I had to find a way to get latitude/longitude from the name of a city, and pass that info into the Hiking Project API. Enter Geocodio!

With Geocodio, all you have to do is register for an API key, then pass in the city/state abbreviation, and voila! You have a latitude/longitude ready to go! Getting trails for any location in the US was now possible, by making back-to-back fetch calls to each API:
export const fetchCityAndTrails = (city = "Foresta", statee = "CA") => {
    return (dispatch) => {
        fetch(`https://api.geocod.io/v1.6/geocode?q=${city}%2c+${statee}&api_key=KEY`)
        .then(resp => resp.json())
        .then(coordinates => fetchTrails(coordinates))


        const fetchTrails = (coordinates) => {
        fetch(`https://www.hikingproject.com/data/get-trails?lat=${coordinates['results'][0]['location']['lat']}&lon=${coordinates['results'][0]['location']['lng']}&maxResults=50&key=KEY`)
        .then(resp => resp.json())
        .then(trails => dispatch({
            type: 'FETCH_TRAILS',
            payload: trails
        }))
        }
    }
}
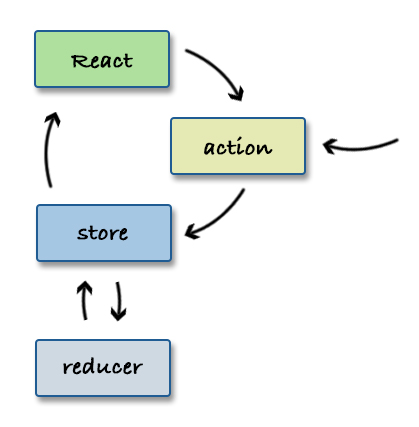
Phase 3.3: State, STAte, STATE!
React uses state to throughout all of its components. State can be utilized in one component, or passed around via props, or held in the Redux store. Learning how to manage state, when to setState, and do anything with state took a good amount of time for me. For instance, my app was firing a fetch call to find a User immediately upon each reload. Figuring out how to use dispatch, map it to props, etc. took a long time, filled with hours of debugging. In the future, I need to remember the Redux pattern for state:
Phase 3.4: Trails and Journal Container
Now that our Redux problems were fixed, it’s time to actually use that information and do something with it! Both of these containers pass props to Trails.js and Journals.js, respectively, and use these props to render each item. By using the map function, rendering was simple. Plus, with some CSS magic, these components were looking great.
Phase 4: Backend reworking
My original thought behind the process of saving a trail was this:
- User sees a trail he or she wants to run on.
- User clicks save, which saves the id (from Hiker Project) of that trail and date of the User’s run into the Trail table in the database.
- When user views their Running Journal, the journal pulls each trail from the database and sends a fetch request to Hiker API’s database, getting information based on the id of that trail.
Remember how I thought a Trail model would be necessary? Well, after trying to make this method work, I decided to go with a different approach that didn’t involve the Trail model:
- User sees a trail he or she wants to run on.
- User clicks save, which saves ALL necessary information from that trail into the Rails API backend database.
- When the user views their Running Journal, the Journal controller matches the user_id with each designated journal for that user.
- Each matching journal then sends their stored information about each trail to the frontend to be rendered.
This created a similar setup to my original, and while I didn’t like having to renavigate my backend, this did not cause any issues and made the app work flawlessly!
Phase 5: Sit back and look for some trails to run on
This project took about two weeks to build, and learning the power of React has been incredible. React is a fast, light-weight library, filled with endless possibilities. I loved building this app, and I can’t wait to learn more JS libraries! But, for now, it’s time to hit the trails!